Running out of storage space on this blog... will continue to share my kitchen adventures in this new space:
http://noobiekitchenexperiment.wordpress.com/
See ya there! :)
Wednesday, December 5, 2012
Wednesday, November 28, 2012
Panfried Threadfin Fillet
Finally a looooong weekend break for me, haven't took leave and rest so long for months! But it was a rather busy 4 days... with family gathering and wedding lunch to attend, and housewarming party to host... continuous feasting. It's time to get back to simple and delightful home-cooked food, and so....I prepared 3 dishes for today's meal.

Panfried Threadfin Fillet
Ingredients: (serves 2)
200g threadfin fillet
1/4tsp salt
1/8tsp pepper
1/4tsp dried parsely
few drops of oil
Directions:
1. Divide the salt, pepper and dried parsely into 2 parts, and rub them on each side of the fish. Set aside for 10-15min.
2. Add a few drops of oil to Happycall double-sided pan, place fish in the middle of the pan and cover the lid. Cook for 5-8min and flip over.
3. Continue frying till the middle of the fish is cooked and the surface turns golden brown. Remove from heat and serve.
Stir fried Brocolli and Cauliflower

Stir fried Brocolli and Cauliflower
Ingredients: (serves 4)
250g broccoli (cut into bite size)
100g cauliflower (cut into bite size)
1/2 small carrot (sliced)
8 frozen cooked shrimps (thawed)
5 fishballs (sliced)
1 slice of bacon (shredded)
2 cloves garlic (minced)
1tbsp oyster sauce
1tsp concentrated chicken stock
120ml water
Directions:
1. Fill half a medium-sized pot with water, bring to boil. Add broccoli and cauliflower, boil for 5min till colour changes. Drain and set aside.
2. Add bacon to a non stick frying pan (no oil needed), fry till bacon turns golden brown and crispy. Remove from heat and set aside.
3. Using the oil left behind by the bacon, stir fry minced garlic till fragrant and golden brown. Add the shrimps, carrot and fishballs, and stir fry for 2min.
4. Add the broccoli and cauliflower, stir fry for 3min. Add oyster sauce and stir well.
5. Add chicken stock to water, stir well, then add the mixture to the pan. Cover the pan to simmer for 1min. Remove from heat and serve.
Bulgogi Beef with Peppers and Onion

Bulgogi Beef with Peppers and Onion
Ingredients: (serves 4)
250g sliced beef
1/2 yellow onion (shredded)
1/2 small carrot (shredded)
1/4 red and yellow pepper each (shredded)
1pkt Korean Bulgogi Marinade (Asian Home Gourmet)
2 cloves garlic
a dash of pepper
few drops of oil
some toasted white sesame seeds
Directions:
1. Marinate beef with the pkt of marinade. Set aside for 1 hour before cooking.
2. Add a few drops of oil to frying pan, stir fry garlic till fragrant and golden brown.
3. Add onion, carrot and peppers, stir fry till soft and cooked.
4. Add beef, stir fry till cooked, then add a dash of pepper.
5. Remove from heat, add sesame seeds onto the dish before serving.
Saturday, November 24, 2012
Blueberry Cheesey Egg Tarts
Sounds weird. doesn't it? Blueberry Cheesey Egg Tarts... hahaha, I have to rename them since they are supposed to be blueberry cheese tarts! Think I diluted the mixture by adding "extra" egg into the cream cheese mixture, didn;t want to waste that half egg left over after making the dough for the pastry. The cream cheese bought from Phoon Huat didn't help either... next time I'll get Kraft Philadelphia cheese and try making again. Oh...and my oven! Should I invest in a oven thermometer? hmmm...
Blueberry Cheesey Egg Tarts
(A) Pastry
Ingredients: (makes 20)
100g butter (room temperature)
40g caster sugar
½ egg
200g plain flour
Directions:
1. Cream the butter with caster sugar until white and creamy.
2. Add egg and continue to beat.
3. Fold in flour until it becomes a dough.
4. Line the small tart tins with dough. Poke holes using a fork on the tart shell.
5. Preheat oven at 175°C for 10 mins and bake for 10-15min till golden brown.
6. Slide tart out from mould and let it cool down.
(B) Cheese filling
Adapted from: not the kitchen sink
Ingredients:
125g cream cheese
30g icing sugar
1tsp orange zest
1/2tsp vanilla essence
25ml evaporated milk
1tbsp cornstarch
1 1/2 egg
some fresh blueberry sauce (or jam)
Directions:
1. Allow the cream cheese to soften before beating in the sugar until creamy.
2. Add the egg into the mixture, together with the orange zest and vanilla essence, mixing well. Pour in the evaporated milk and mix until well incorporated.
To assemble the tart:
1. Pour the cream cheese filling into the cooled tart shells, until about 80% filled. Spoon some blueberry sauce into the tart shells.
2. To create a marbled effect, use a toothpick to draw the blueberry sauce in the cream cheese in a swirly motion.
3. Bake the tarts at 170deg for another 10-15min, or until the cream cheese filling is set and the tart crust is golden brown in color.
4. Remove from oven and cool for at least 30 min before consuming.
 |
| overbaked! :( |
(A) Pastry
Ingredients: (makes 20)
100g butter (room temperature)
40g caster sugar
½ egg
200g plain flour
Directions:
1. Cream the butter with caster sugar until white and creamy.
2. Add egg and continue to beat.
3. Fold in flour until it becomes a dough.
4. Line the small tart tins with dough. Poke holes using a fork on the tart shell.
5. Preheat oven at 175°C for 10 mins and bake for 10-15min till golden brown.
6. Slide tart out from mould and let it cool down.
(B) Cheese filling
Adapted from: not the kitchen sink
Ingredients:
125g cream cheese
30g icing sugar
1tsp orange zest
1/2tsp vanilla essence
25ml evaporated milk
1tbsp cornstarch
1 1/2 egg
some fresh blueberry sauce (or jam)
Directions:
1. Allow the cream cheese to soften before beating in the sugar until creamy.
2. Add the egg into the mixture, together with the orange zest and vanilla essence, mixing well. Pour in the evaporated milk and mix until well incorporated.
To assemble the tart:
1. Pour the cream cheese filling into the cooled tart shells, until about 80% filled. Spoon some blueberry sauce into the tart shells.
2. To create a marbled effect, use a toothpick to draw the blueberry sauce in the cream cheese in a swirly motion.
3. Bake the tarts at 170deg for another 10-15min, or until the cream cheese filling is set and the tart crust is golden brown in color.
4. Remove from oven and cool for at least 30 min before consuming.
Thursday, November 22, 2012
Mini Quiche
Baked this for hubb's breakfast the next day, and also to clear some of the ingredients left in the fridge... bacon, minced beef, half onion and cut capsicums. Came out with two flavours...and both are hubb's favourite :)
Mini Quiche
(A) Pastry
Ingredients: (makes 8)
120g plain flour
80g butter
1/2 egg (lightly beaten)
2tsp sugar
Directions for the pastry:
1. Cut cold butter into small cubes. Combine flour and mix well.
2. Rub in the cold butter and mix well. Add half of the beaten egg and vanilla essence, mix to form a soft dough (do not knead). Set aside the remaining egg for glazing later.
3. Wrap with cling wrap and refrigerate at least 30min before use.
4. Prepare the filling while waiting.
5. After 30min, preheat oven at 180deg.
6. Take out dough and divide it into equal parts (depending on the size of your mould, mine is around 6cm, enough for me to make 8 pieces). Press the dough into tart moulds evenly.
7. Bake for 10-15min till crust turns slightly brown, remove from oven and set aside.
(B) Quiche filling (beef and bacon flavour)
Ingredients:
2 slices bacon (cut into small strips)
4tbsp minced beef
1/2 onion (diced)
1/8 red and yellow capsicum each (diced)
some grated cheese
1tbsp light soy sauce
a dash of black pepper
Directions:
1. Marinate the beef with light soy sauce and pepper. Set aside.
2. Heat up frying pan, no oil required. Add bacon and fry till crispy. Remove from heat and set aside.
3. Using the oil left behind from the bacon, stir fry the onion and capsicum together till soften and onion turns slightly brown. Remove from heat and set aside.
4. Add minced beef and stir fry till cooked. Remove from heat and set aside.
Ingredients for egg custard:
1 1/2 eggs (lightly beaten)
150ml fresh milk
a pinch of salt
Directions: Mix the above ingredients in a measuring cup (with sprout) and stir well.
To assemble:
1. Preheat oven at 160deg.
2. Divide bacon into 4 equal portions and fill them into 4 quiche casing. Do the same for the beef.
3. Divide the onion and capsicums equally and fill them in all the quiche casings.
4. Pour the egg and milk mixture into each quiche till 90% full. Spread grated cheese on the surface.
5. Bake for 15-25min till quiche surface turns brown. Serve warm.
 |
| the bacon ones... |
 |
| and the minced beef flavour... looks like chocolate chips huh? :P |
(A) Pastry
Ingredients: (makes 8)
120g plain flour
80g butter
1/2 egg (lightly beaten)
2tsp sugar
Directions for the pastry:
1. Cut cold butter into small cubes. Combine flour and mix well.
2. Rub in the cold butter and mix well. Add half of the beaten egg and vanilla essence, mix to form a soft dough (do not knead). Set aside the remaining egg for glazing later.
3. Wrap with cling wrap and refrigerate at least 30min before use.
4. Prepare the filling while waiting.
5. After 30min, preheat oven at 180deg.
6. Take out dough and divide it into equal parts (depending on the size of your mould, mine is around 6cm, enough for me to make 8 pieces). Press the dough into tart moulds evenly.
7. Bake for 10-15min till crust turns slightly brown, remove from oven and set aside.
(B) Quiche filling (beef and bacon flavour)
Ingredients:
2 slices bacon (cut into small strips)
4tbsp minced beef
1/2 onion (diced)
1/8 red and yellow capsicum each (diced)
some grated cheese
1tbsp light soy sauce
a dash of black pepper
Directions:
1. Marinate the beef with light soy sauce and pepper. Set aside.
2. Heat up frying pan, no oil required. Add bacon and fry till crispy. Remove from heat and set aside.
3. Using the oil left behind from the bacon, stir fry the onion and capsicum together till soften and onion turns slightly brown. Remove from heat and set aside.
4. Add minced beef and stir fry till cooked. Remove from heat and set aside.
Ingredients for egg custard:
1 1/2 eggs (lightly beaten)
150ml fresh milk
a pinch of salt
Directions: Mix the above ingredients in a measuring cup (with sprout) and stir well.
To assemble:
1. Preheat oven at 160deg.
2. Divide bacon into 4 equal portions and fill them into 4 quiche casing. Do the same for the beef.
3. Divide the onion and capsicums equally and fill them in all the quiche casings.
4. Pour the egg and milk mixture into each quiche till 90% full. Spread grated cheese on the surface.
5. Bake for 15-25min till quiche surface turns brown. Serve warm.
Wednesday, November 21, 2012
Chicken Kebab
Finally got the chance to try out the pack of skewers bought from Daiso, 5 pcs for only $2! It's definitely a simple and yummy dish, I served it with white rice and campbell cream of mushroom soup. But one thing I didn't expect was the grilling time of my microwave grill oven, it took rather long for the meat to cook, even though they are already cut into such small pieces...still figuring out the reason. Hmm... maybe should try grilling in happycall double-sided pan next time, to save my electricity bill? :P

Chicken Kebab
Ingredients: (makes 5 sticks)
2 chicken thigh meat (deboned, cut into bite size)
1/2 red and yellow capsicum each (cut into bite size)
1/2 onion (cut into bite size)
1 small japanese cucumber (cut into 0.5cm slices)
2tbsp korean bulgolgi sauce
a dash of black pepper
a dash of mixed herbs
Directions:
1. Marinate the chicken with the bulgolgi sauce, pepper and mixed herbs. Refridgerate for at least 1 hour before cooking.
2. After 1 hour, drain the chicken,add the cucumber and onion into the marinate sauce for the chicken.
3. Divide all the ingredients equally into 5 portions, and poke them through the skewer, alternating the ingredients to get a nice colur combination.
4. Grill in microwave oven (high power) for 40min or till browned and cooked.
Ingredients for the drizzle sauce:
1tbsp hoisin sauce
1tsp honey
2tbsp hot water
Directions: Mix the above ingredients in a small bowl and stir well. Drizzle over the kebab when it's ready.
Pandan Chiffon Cake
My all time favourite cake!
In fact, this is my second attempt in 4 days... the first one failed, half of the cake collapsed :(. Think I underbaked it. So this time, to use up my remaining pandan juice and also to find out if underbaking was the real cause of my previous failure , I tried again...after 3 days. This time round I baked slightly longer, using mainly the lower heat, and finally...I declare the attempt successful :)
However, still not satisfied with the fragrance of the pandan in the cake. Perhaps I diluted the juice too much, or perhaps, the leaves were not fragrant enough. Even though I bought two stalks, I can hardly smell its fragrance when the vegetable seller handed them to me. Will try again the next time when I get hold of really nice and fragrant leaves.
Pandan Chiffon Cake
Adapted from: http://en.christinesrecipes.com/2011/06/pandan-chiffon-cake.html
Ingredients for batter:
6 egg yolks (50g egg)
20g caster sugar
100g cake flour
100ml evaporated milk
2tbsp pandan juice (see below for making pandan juice)
40g vegetable oil
Ingredients for egg whites:
6 egg whites
70g caster sugar
1/2tsp cream of tartar
Ingredients of pandan juice:
20 pandan leaves
1 1/2 tbsp water
Directions:
1. Preheat oven to 170deg.
2. Whisk the egg yolks with sugar till pale and creamy. Add evaporated milk, pandan juice. Combine well.
3. Sift in cake flour in three batches into the egg yolk mixture. Mix well. Lastly, add vegetable oil and mix well. Set aside.
4. Use a large clean bowl, making sure there’s no water or oil in it. Beat the egg whites with an electric mixer until bubbles form. Add the cream of tartar.
5. After mixing well, add the sugar in three batches, about one-third at a time, and beat well between additions. Continue to beat until stiff peaks form.
6. Spoon out 1/3 of the beaten egg whites and fold into the egg yolk mixture. Lightly fold in the rest of the beaten egg whites with a spatula, until just combined.
7. Pour into ungreased chiffon pan (23cm) and bake for about 35 to 40 minutes. After baking the first 15 minutes, if you find your cake gets browning, reduce heat to 150deg, continue to bake until cooked through. A needle comes out clean when inserted in the middle.
8. Remove cake from the oven. invert the pan immediately. Allow it to cool completely.
To make pandan juice:
1. Cut pandan leaves into thin shreds, pop in a food processor and add about 1 1/2tbsp of water. Process to small pieces.
2. Place pandan leaves in a muslin bag and squeeze out the juice. You need about 2tbsp of it to make this cake. If you don’t have a muslin bag, just use your clean hand to squeeze out the juice.
In fact, this is my second attempt in 4 days... the first one failed, half of the cake collapsed :(. Think I underbaked it. So this time, to use up my remaining pandan juice and also to find out if underbaking was the real cause of my previous failure , I tried again...after 3 days. This time round I baked slightly longer, using mainly the lower heat, and finally...I declare the attempt successful :)
However, still not satisfied with the fragrance of the pandan in the cake. Perhaps I diluted the juice too much, or perhaps, the leaves were not fragrant enough. Even though I bought two stalks, I can hardly smell its fragrance when the vegetable seller handed them to me. Will try again the next time when I get hold of really nice and fragrant leaves.
 |
| mixing still not even... more practice needed!! |
Adapted from: http://en.christinesrecipes.com/2011/06/pandan-chiffon-cake.html
Ingredients for batter:
6 egg yolks (50g egg)
20g caster sugar
100g cake flour
100ml evaporated milk
2tbsp pandan juice (see below for making pandan juice)
40g vegetable oil
Ingredients for egg whites:
6 egg whites
70g caster sugar
1/2tsp cream of tartar
Ingredients of pandan juice:
20 pandan leaves
1 1/2 tbsp water
Directions:
1. Preheat oven to 170deg.
2. Whisk the egg yolks with sugar till pale and creamy. Add evaporated milk, pandan juice. Combine well.
3. Sift in cake flour in three batches into the egg yolk mixture. Mix well. Lastly, add vegetable oil and mix well. Set aside.
4. Use a large clean bowl, making sure there’s no water or oil in it. Beat the egg whites with an electric mixer until bubbles form. Add the cream of tartar.
5. After mixing well, add the sugar in three batches, about one-third at a time, and beat well between additions. Continue to beat until stiff peaks form.
6. Spoon out 1/3 of the beaten egg whites and fold into the egg yolk mixture. Lightly fold in the rest of the beaten egg whites with a spatula, until just combined.
7. Pour into ungreased chiffon pan (23cm) and bake for about 35 to 40 minutes. After baking the first 15 minutes, if you find your cake gets browning, reduce heat to 150deg, continue to bake until cooked through. A needle comes out clean when inserted in the middle.
8. Remove cake from the oven. invert the pan immediately. Allow it to cool completely.
To make pandan juice:
1. Cut pandan leaves into thin shreds, pop in a food processor and add about 1 1/2tbsp of water. Process to small pieces.
2. Place pandan leaves in a muslin bag and squeeze out the juice. You need about 2tbsp of it to make this cake. If you don’t have a muslin bag, just use your clean hand to squeeze out the juice.
Tuesday, November 20, 2012
Chicken Pie
Today's bake is specially done for mum, since this is one of her favourite snack. Fresh from the oven during teatime, it goes really well with a cup of hot milk tea or coffee :)

Chicken Pie
Ingredients: (makes 7)
200g plain flour
110g butter
1 egg (lightly beaten)
200g chicken breast meat (diced)
100g frozen mixed vegetables (defrost not necessary)
1 pkt campbell instant chicken soup powder
1/2tsp vanilla essence
2tsp sugar
1tbsp light soy sauce
a dash of pepper
150ml hot water
some oil
Directions for the pastry:
1. Cut cold butter into small cubes. Combine flour and mix well.
2. Rub in the cold butter and mix well. Add half of the beaten egg and vanilla essence, mix to form a soft dough (do not knead). Set aside the remaining egg for glazing later.
3. Wrap with cling wrap and refrigerate at least 30min before use.
4. Prepare the filling while waiting.
Directions for the filling:
1. Marinate the chicken with light soy sauce and pepper.
2. Add hot water to campbell instant soup powder in a bowl, mix well, set aside.
3. Boil the frozen vegetables in hot water for 3min, drain and set aside.
4. Add a few drops of oil in a saucepan, add chicken meat and stir fry for 3min.
5. Add the campbell soup into the saucepan, stir well, and add the frozen vegetables. Turn down the flame to low heat, simmer for about 5min, stirring in between to prevent burning at the bottom of the pot. Remove from heat and set aside.
To assemble:
1. Preheat oven at 180deg.
2. Using two-third of the dough, divide the dough into equal parts (depending on the size of your mould, mine is around 6cm, enough for me to make 7 pieces only). Press the dough into tart moulds evenly.
3. Fill the moulds with the filling, till 80% full.
4. Divide the last third of the dough into equal parts according to the number of moulds you have. (I divided mine into 7 parts) Roll out each part with a rolling pin, cut a circle out using the tart mould.
5. Cover the moulds with the circle dough, press the edges down lightly using a fork. Poke some holes on the surface of the pie and glaze the top with the remaining egg.
6. Bake for 25-30min till pie surface turns golden brown.

 |
| filled with succulent chunky chicken meat! :) |
 |
| not enough dough to cover the top...became a chicken tart instead :D |
Ingredients: (makes 7)
200g plain flour
110g butter
1 egg (lightly beaten)
200g chicken breast meat (diced)
100g frozen mixed vegetables (defrost not necessary)
1 pkt campbell instant chicken soup powder
1/2tsp vanilla essence
2tsp sugar
1tbsp light soy sauce
a dash of pepper
150ml hot water
some oil
Directions for the pastry:
1. Cut cold butter into small cubes. Combine flour and mix well.
2. Rub in the cold butter and mix well. Add half of the beaten egg and vanilla essence, mix to form a soft dough (do not knead). Set aside the remaining egg for glazing later.
3. Wrap with cling wrap and refrigerate at least 30min before use.
4. Prepare the filling while waiting.
Directions for the filling:
1. Marinate the chicken with light soy sauce and pepper.
2. Add hot water to campbell instant soup powder in a bowl, mix well, set aside.
3. Boil the frozen vegetables in hot water for 3min, drain and set aside.
4. Add a few drops of oil in a saucepan, add chicken meat and stir fry for 3min.
5. Add the campbell soup into the saucepan, stir well, and add the frozen vegetables. Turn down the flame to low heat, simmer for about 5min, stirring in between to prevent burning at the bottom of the pot. Remove from heat and set aside.
To assemble:
1. Preheat oven at 180deg.
2. Using two-third of the dough, divide the dough into equal parts (depending on the size of your mould, mine is around 6cm, enough for me to make 7 pieces only). Press the dough into tart moulds evenly.
3. Fill the moulds with the filling, till 80% full.
4. Divide the last third of the dough into equal parts according to the number of moulds you have. (I divided mine into 7 parts) Roll out each part with a rolling pin, cut a circle out using the tart mould.
5. Cover the moulds with the circle dough, press the edges down lightly using a fork. Poke some holes on the surface of the pie and glaze the top with the remaining egg.
6. Bake for 25-30min till pie surface turns golden brown.
Sunday, November 18, 2012
Egg Pudding topped with Fresh Grapes
Left with a single egg yolk resting in my fridge after making the chiffon cake, what shall I do with it? Was browsing around online and found a dessert recipe, creme brulee with caramel sauce! A perfect dessert which will help me clear that egg yolk and most importantly, to welcome hubbs home after 2 weeks since he loves caramel!
But you may wonder, where is my caramel sauce then? Oh well... I still haven't figure out what happened to it either. Followed the recipe, using the exact amount of ingredients and the steps... instead of getting a nice brown caramel sauce, what I acheived was a sugar syrup, with the water evaporating very quickly and in no time, the syrup "changed" back into sugar again! No browning took place...hmmm. Due to time constraint as I was rushing off to work, I couldn't experiment another round, and hence, produced this dessert with Taiwan grapes given by mum from her Taiwanese friend. Glad that hubbs still enjoyed it :)
Egg Pudding topped with Fresh Grapes
Ingredients: (makes 6 small cups)
250ml milk
2tbsp sugar
1 egg
1 egg yolk
1/4tsp vanilla essence
6-9 grapes (cut into halves)
Directions:
1. Preheat oven to 170deg.
2. Simmer sugar and milk in a saucepan till sugar dissolved and milk is warm.
3. In a separate bowl, whisk the egg, egg yolk and vanilla essence together.
4. Pour some warm milk slowly into the beaten egg mixture, stir well.
5. Pour the egg mixture back into remaining warm milk, stir well, then strain the mixture.
6. Pour mixture into moulds, steam bake pudding in preheated oven for 25min till set.
7. Remove from oven, allow the pudding to cool on a rack, then chill in fridge.
8. To unmould: slowly loosen the sides, then sit mould in shallow hot water to loosen the base. Invert pudding onto dish, add grapes as toppings and serve.
But you may wonder, where is my caramel sauce then? Oh well... I still haven't figure out what happened to it either. Followed the recipe, using the exact amount of ingredients and the steps... instead of getting a nice brown caramel sauce, what I acheived was a sugar syrup, with the water evaporating very quickly and in no time, the syrup "changed" back into sugar again! No browning took place...hmmm. Due to time constraint as I was rushing off to work, I couldn't experiment another round, and hence, produced this dessert with Taiwan grapes given by mum from her Taiwanese friend. Glad that hubbs still enjoyed it :)
 |
| thanks to the pandan leaves, makes the pudding looks nicer :) |
Egg Pudding topped with Fresh Grapes
Ingredients: (makes 6 small cups)
250ml milk
2tbsp sugar
1 egg
1 egg yolk
1/4tsp vanilla essence
6-9 grapes (cut into halves)
Directions:
1. Preheat oven to 170deg.
2. Simmer sugar and milk in a saucepan till sugar dissolved and milk is warm.
3. In a separate bowl, whisk the egg, egg yolk and vanilla essence together.
4. Pour some warm milk slowly into the beaten egg mixture, stir well.
5. Pour the egg mixture back into remaining warm milk, stir well, then strain the mixture.
6. Pour mixture into moulds, steam bake pudding in preheated oven for 25min till set.
7. Remove from oven, allow the pudding to cool on a rack, then chill in fridge.
8. To unmould: slowly loosen the sides, then sit mould in shallow hot water to loosen the base. Invert pudding onto dish, add grapes as toppings and serve.
Wednesday, November 14, 2012
Orange Chiffon Cake
I've done it, my favourite chiffon! Extremely happy with the result of this cake, especially after reading so many "scary" things that could go wrong for a chiffon cake. Managed to acheive one that is nicely shaped, spongy, moist and fragrant, but needs improvement on the folding and mixing of the yolks and whites, and also more confidence during the baking process. I was practically standing beside the oven throughout, opening the door to check on the cake every now and then. But alas, the "painstaking care and attention" given to it paid off! Next project... my all-time favourite... Pandan Chiffon!! :)
Orange Chiffon Cake
Adapted from: wensdelight
Ingredients:
(A) 5 egg yolks, 40g castor sugar
(B) 80ml orange juice, 50g sunflower oil
(C) 100g cake flour (Sieve twice), zests from 1 orange
(D) 6 egg whites, 80g castor sugar, 1/2tsp cream of tartar
Directions: (For 23cm chiffon mould)
Preheat oven at 170deg
Part A:
1. Whisk (A) till the egg yolks turn creamy pale yellow colour or till sugar melt.
2. Add in (B) and mix well.
3. Fold in (C) and mix well.
Part B:
1. Whisk egg whites till foamy, add cream of tartar, then add sugar in batches and whisk till stiff peak forms.
2. Add in 1/3 of the egg white mixture into Part A mixture and mix well.
3. Pour this mixture back to the remaining egg white mixture and fold well till the mixture is smooth flowing and glossy.
4. Pour into a clean & grease free 23cm chiffon mould and bake for 40-50 mins or till cooked. Bang the mould before going into the oven to release excess air. To test doneness of the cake, bake until the cake rises high and then starts to shrink.
5. When the cake is cooked, invert the cake to cool. Remove the cake from the cake pan when it is completely cool (takes around 1hr).
 |
| nicely shaped, but destroyed by my lousy unmoulding skill...haha |
 |
| soft, moist and spongy :) |
Orange Chiffon Cake
Adapted from: wensdelight
Ingredients:
(A) 5 egg yolks, 40g castor sugar
(B) 80ml orange juice, 50g sunflower oil
(C) 100g cake flour (Sieve twice), zests from 1 orange
(D) 6 egg whites, 80g castor sugar, 1/2tsp cream of tartar
Directions: (For 23cm chiffon mould)
Preheat oven at 170deg
Part A:
1. Whisk (A) till the egg yolks turn creamy pale yellow colour or till sugar melt.
2. Add in (B) and mix well.
3. Fold in (C) and mix well.
Part B:
1. Whisk egg whites till foamy, add cream of tartar, then add sugar in batches and whisk till stiff peak forms.
2. Add in 1/3 of the egg white mixture into Part A mixture and mix well.
3. Pour this mixture back to the remaining egg white mixture and fold well till the mixture is smooth flowing and glossy.
4. Pour into a clean & grease free 23cm chiffon mould and bake for 40-50 mins or till cooked. Bang the mould before going into the oven to release excess air. To test doneness of the cake, bake until the cake rises high and then starts to shrink.
5. When the cake is cooked, invert the cake to cool. Remove the cake from the cake pan when it is completely cool (takes around 1hr).
Monday, November 12, 2012
Pandan Yoghurt Swissroll with Custard Peach Filling
Roll roll roll....my first swissroll :) No cream, no oil, modified the recipe using all the ingredients that I like... pandan, custard and peach! Not a bad attempt, though the cake was a little rough as i chose the "lazy"method mixing whole eggs instead of beating the yolks and whites separating (the chiffon way). Custard was too thick and I ended up with a very "heavy" swissroll, perhaps better if reduce the amount by one third.

Pandan Yoghurt Swissroll with Custard Peach Filling
Adapted from: passionbaker
Ingredients: (Makes approximately 13" x 11" sheet pan)
4 eggs
60g fine sugar
80g cake flour, sifted
a pinch of salt
40g yoghurt
1tsp pandan paste
Directions:
1. Whisk the eggs until lighten, then add the sugar gradually and beat till thick and lighten (thick ribbon stage).
2. Add sifted flour and salt in batches into the egg batter, fold to combine.
3. Add pandan paste to yoghurt, mix well. Fold into the batter to combine. The batter will be smooth and thick.
4. Pour into a lined sheet pan, and bake it at preheated oven of 180deg for about 10-12mins, until cake is cooked and top layer is golden brown.
5. Let it cool for a while and unmould from pan.
Ingredients for the custard filling:
350ml milk
40g custard powder
1/2tsp vanilla essence
40g sugar
6-7 slices canned peach (pureed)
Directions:
1. Add all the dry ingredients into a saucepan, then add in milk gradually, stir constantly to avoid lumps from forming.
2. Heat mixture over medium low heat, stir constantly till mixture thickens. Add peach puree and combine well. Remove from heat.
3. Allow the mixture to cool down, then spread evenly onto the cake and roll it up before serving.
Saturday, November 10, 2012
Japchae with Chicken and Vege
The mini get-together that we have been anticipating.... our DIY yummy lunch date! Initially, we worried that we wouldn't have enough time to whip up a meal, as JM had to rush to work. But xiaomei n I decided to prepare a fast and simple meal to "surprise" her, instead of meeting at the hawker center for lunch. And so, we came out with this korean-style menu... Japchae and Pajeon, all done in an hour's time :)
Japchae with Chicken and Vege
Ingredients: (serves 3)
1/3pkt CJ (Korean brand) glass noodles
200g chicken breast meat (sliced)
1 carrot (shredded)
50g baby spinach
2 eggs, lightly beaten
2 garlic (minced)
1tbsp light soy sauce
dash of pepper
1/2 cup CJ Korean BBQ sauce
some toasted white sesame seeds
1/2 tsp oil
Directions:
1. Fill half a medium sized pot with water and bring to boil. Add glass noodles in, make sure the noodles are submerged in the water (add more water if necessary).
2. Cook noodles for 8-10min till noodles are soft but chewy, then remove them from hot water and plunge them into cold water for 1 min. Drain water and set noodles aside.
3. Season chicken with light soy sauce and pepper, set aside.
4. Heat up non-stick frying pan with oil, add in the egg mixture, and swerve the pan till egg is evenly spread over the pan. Fry till the edge of the egg mixture is dry, flip over and fry till lightly browned. Remove from pan and set aside. Shred the omelette when it is cool.
5. Using the same pan, add garlic and fry till brown and fragrant.
6. Add the carrots and chicken, stir fry for about 3 min. Add in spinach and stir fry till all ingredients are cooked.
7. Add in the noodles, then add the BBQ sauce to season. (add more sauce if necessary to suit your taste) When sauce is evenly incorporated, remove from heat.
8. Garnish with the shredded omelette and some toasted white sesame, and the japchae is ready to serve.
 |
| yummy! |
Japchae with Chicken and Vege
Ingredients: (serves 3)
1/3pkt CJ (Korean brand) glass noodles
200g chicken breast meat (sliced)
1 carrot (shredded)
50g baby spinach
2 eggs, lightly beaten
2 garlic (minced)
1tbsp light soy sauce
dash of pepper
1/2 cup CJ Korean BBQ sauce
some toasted white sesame seeds
1/2 tsp oil
Directions:
1. Fill half a medium sized pot with water and bring to boil. Add glass noodles in, make sure the noodles are submerged in the water (add more water if necessary).
2. Cook noodles for 8-10min till noodles are soft but chewy, then remove them from hot water and plunge them into cold water for 1 min. Drain water and set noodles aside.
3. Season chicken with light soy sauce and pepper, set aside.
4. Heat up non-stick frying pan with oil, add in the egg mixture, and swerve the pan till egg is evenly spread over the pan. Fry till the edge of the egg mixture is dry, flip over and fry till lightly browned. Remove from pan and set aside. Shred the omelette when it is cool.
5. Using the same pan, add garlic and fry till brown and fragrant.
6. Add the carrots and chicken, stir fry for about 3 min. Add in spinach and stir fry till all ingredients are cooked.
7. Add in the noodles, then add the BBQ sauce to season. (add more sauce if necessary to suit your taste) When sauce is evenly incorporated, remove from heat.
8. Garnish with the shredded omelette and some toasted white sesame, and the japchae is ready to serve.
Korean Pancake (Pajeon) with Sausage, Seafood and Capsicum

Korean Pancake (Pajeon) with Sausage, Seafood and Capsicum
Ingredients: (serves 3)
100g CJ korean pancake mix
170ml water
1 chicken sausage (cut into shreds)
2 crab sticks (cut into shreds)
1/2 yellow and red capsicum respectively (cut into shreds)
6 cooked shrimps (diced)
1 tsp oil
Directions:
1. Add water gradually to the pancake mix in a bowl. Stir constantly to achieve a smooth batter.
2. Heat up non-stick frying pan with oil, add all the ingredients and stir fry for about 3-5min till cooked.
3. Spread ingredients evenly over the pan, then pour in the batter, swerve the pan slightly so that the batter covers all the ingredients in the pan. Fry till the edge of the pancake iss dry and starts to brown.
4. Flip over the pancake, fry for another 3min till golden brown.
5. Remove from heat and serve warm.
Milk Pudding with Peach Puree and Kiwi
And the special dessert prepared for the gals... this is the same as the Panna Cotta made previously, just using different ingredients as toppings. This easy to make and refreshing dessert has once again proven to be a "hit", and will definitely be listed in the menu of my "private restaurant" for guests next time :)

Milk Pudding with Peach Puree and Kiwi
Ingredients: (makes 5 small cups)
2tsp gelatine powder
3tbsp water
450ml fresh milk (I used Meiji)
2tbsp sugar
1/2tsp vanilla essence
Directions:
1. Add gelatine powder to water, stir to dissolve the powder.
2. Combine the remaining ingredients in a saucepan and heat over low heat, stir till sugar dissolves and tiny bubbles appear around the edge of the pot.
3. Remove from heat and add in the gelatine mixture, stir until thoroughly incorporated.
4. Pour mixture into small cups, leave to cool till room temperature and refridgerate for at least 3 hours.
5. Serve with peach puree and fresh kiwi.
Ingredients for the peach puree:
8 slices of canned peach (diced)
1tbsp sugar
2tbsp water
Directions:
1. Add the above ingredients in a saucepan. Boil till peach becomes soft and sugar dissolves. Remove from heat.
2. Pour the mixture onto a plate, mash the peach with fork and stir the mixture well. Set aside to cool till room temperature and chill in refridgerator until serving the dessert.
Friday, November 9, 2012
Banana Flavoured Custard Puff with Peach
Ever since the not so successful attempt at choux pastry the other day, I just had the urge to try making again. Finally, I sucummbed to it 3 days later, after I came across the beautiful cream puffs sandwiched with fresh strawberries by TinTin. I followed her recipe, but modified the custard to make a banana-flavoured one just to be different. Again, my puffs didn't puff up well enough, except for that one single piece which I've placed inside a tart case, stacked on top and along the edge of the baking tray, as I ran out of space on the tray. Hmm... successful cos it received more heat from the top? Have to experiment again to find out.
Meanwhile, here's how the puffs look like, they still tasted nice though :)

Banana Flavoured Custard Puff with Peach
Adapted from: Cooking CraveFor the Pastry: (Yields 15 puffs)
70g plain flour
2 beaten eggs
100g water
60g unsalted butter
Pinch of sugar and salt
Directions:
1. Add water, butter, pinch of sugar and salt into saucepan, melt the butter and bring to boil. Off the heat, add in plain flour and mix with a wooden spoon until well combine and become smooth dough.
2. Add in half of the beaten eggs and keep stirring until the egg mix into the mixture. Once the eggs completely mix with the dough, you will find it quite dry and hardly to mix.
3. Continue add the beaten eggs slowly, little by little into the dough and continue mixing. You might not finish using the beaten eggs.
4. Control adding the eggs to get a smooth and silky consistency of the mixture. When you spoon up the mixture, it should drop back to the pan very slowly. The mixture should not be too dry or too wet
5. Transfer it into a piping bag and pipe out about 15 dollops of mixture on a baking tray lined with baking paper.
6. Dip your fingers with some water and gently touch the top of the mixture. This is to prevent it over burning while it's baking in the oven. Then spray some water on the mixture surface. (Not too much)
7. Bake at 200deg preheated oven for 15 minutes until it puff up, then turn the temperature to 170deg and bake for another 15 minutes. Transfer the puffs on a wire rack to cool down.
For the Custard Filling:
2 egg yolks
200ml banana milk (I used the korean brand "Binggrae", but I guess any flavoured milk will do as well)
1.5tbsp fine sugar
20g corn flour
5 slices of canned peach (cut into small pieces)
Directions:
1. Boil the milk with sugar in low heat until sugar dissolve but not boiling. Meanwhile, mix the egg yolks and cornflour into a thick paste but no lumps in it.
2. Pour the dissolve warm sugar milk mixture into the egg yolks mixture. Pour slowly, little by little and mix with a hand whisk until everything well combine (*strain the mixture if necessary) Then, pour back the mixture into the cooking pan. Cook in very low heat and keep stirring until it thicken.
3. Once the mixture thicken, remove from the heat and keep stirring until the heat slightly cool down but slightly warm.(*It look silky smooth at this time)
4. Transfer the custard into a plate and cover with cling film. Make sure the cling film touch on the mixture, this is to prevent it from skin forming on its surface.
5. To assemble the custard puffs: Spoon in some custard fillings then sandwich it with the peach. Chill the puffs in the fridge before serve.
Thursday, November 8, 2012
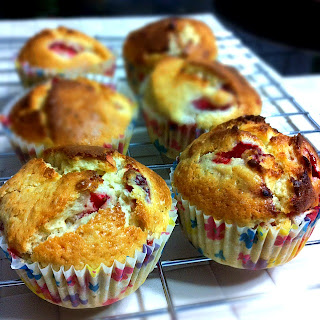
Blueberry Orange Muffins
Baked this specially for mum for our coffee break today... as promised :) Tried out the creaming method, yes it's sinful considering the amount of butter used, but it was soft, fluffy and fragrant! Will probably stick to this method for muffins next time.

Blueberry Orange Muffins
Adapted from: Happy Home Baking
Ingredients: (makes 8 muffins)
110g unsalted butter, soften at room temperature
100g fine sugar
2 eggs (large), lightly beaten
1/2 tsp vanilla essence
30ml fresh orange juice
zests from 1 orange
160g plain flour
1 tsp baking powder
100g blueberries
Directions:
1. Wash and drain blueberries. Dry berries with paper towels and toss them in 1-2 tsp of flour (extra). Set aside.
2. Sieve together flour and baking powder into a mixing bowl. Set aside.
3. Cream butter with sugar till the mixture turns pale, light and fluffy.
4. Dribble in the eggs gradually and beat till incorporated in the batter.
5. Add vanilla essence. Whisk to combine.
6. Add orange juice. Whisk to combine.
7. Add flour mixture, orange zests and berries in two batches. With a spatula fold the mixture until the flour is just incorporate into the batter.
Note: DO NOT over mix. The batter should be thick and not thin and runny.
8. Spoon batter into paper muffin cups. Bake in preheated oven at 190deg for 25-30 min until muffins turn golden brown or a toothpick inserted into the centre comes out clean.
Let muffins cool on a wire rack. Serve warm.
Sausage Pizza on Prata Crust
Woke up rather late this morning, and was lazy to get out of house to buy food. So I just opened my fridge, using the ingredients available and whipped up a quick and filling brunch for myself. Pizza crust using prata, after pan frying and baked till golden brown, it was amazingly nice and crispy!

Sausage Pizza on Prata Crust
Ingredients:
1 piece plain prata (frozen, do not defrost)
1/8 slice red capsicum (diced)
1/8 slice yellow capsicum (diced)
2 sausages (sliced)
2 slices of cheese (shredded)
4 tbsp pasta sauce
some dried parsely as garnish
Directions:
1. Heat up frying pan, fry the frozen prata till both sides turn golden brown. Place prata on a round baking tray, spread half the shredded cheese evenly over prata and set aside.
2. Stir fry sausages, red and yellow capsicums for 3 min, add in pasta sauce and simmer for another 2min. Remove from heat.
3. Preheat oven at 180deg. Spread the stir fried ingredients evenly over prata, spread the remaining cheese on top.
4. Bake the prata till cheese on top melts and edge of prata turns golden brown, around 5-8min. Serve warm.
Tuesday, November 6, 2012
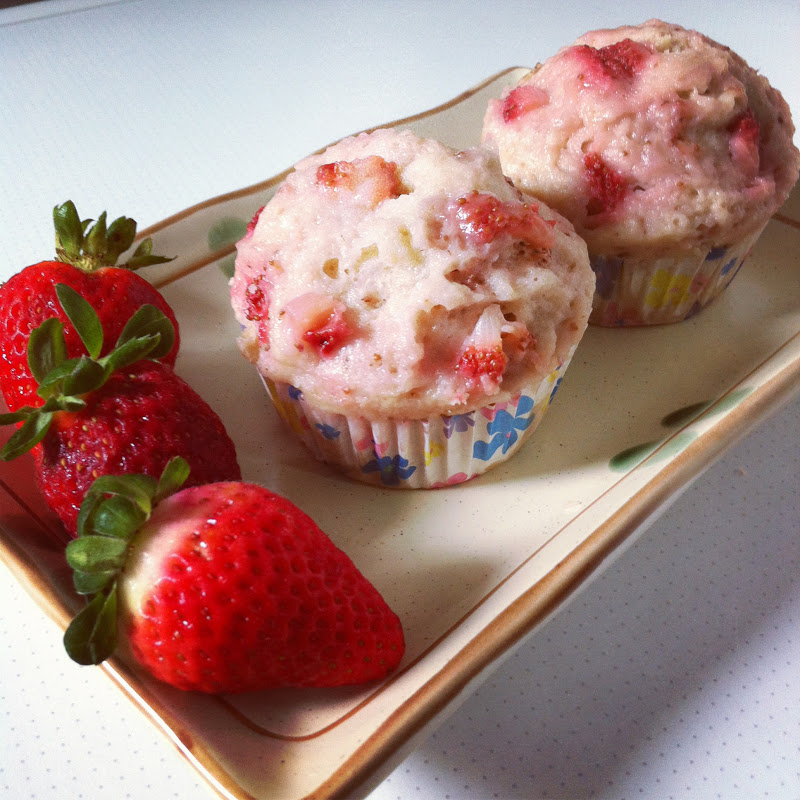
Strawberry Yoghurt Muffins
My first attempt in muffin baking... declared success :)
Strawberry Yoghurt Muffins
Adapted from: DreamersLoft
Ingredients: (makes 6 muffins)
125g plain flour
1/2tsp baking powder
80g sugar
80g plain yoghurt (marigold low fat)
15ml evaporated milk
40g butter (melted)
1 large egg
1/2tsp vanilla essence
6-7 strawberries (diced)
Directions:
1. Sift flour and baking powder together. Add sugar and mix till well incorporated.
2. Mix yoghurt, evaporated milk, melted butter, egg and vanilla extract and stir well.
3. Add the wet ingredients (2) to the dry ingredients (1) and fold gently till just incorporated. Do not over mix as it will result in a tough texture.
4. Fold the diced strawberries into the mixture.
5. Spoon the batter into the muffin cases (each about 2/3 filled).
6. Bake for 20 minutes in preheated oven of 200deg or until slightly golden brown. Allow to rest for several minutes before serving.
Monday, November 5, 2012
Strawberry Steamed Cake
My second attempt in 4 days, since there are some leftover strawberry sauce from my panna cotta. This time, I reduced the amount of flour, achieved a slightly more "moist" mixture, and end result was better than previous one. The best part is... the fragrance of the strawberries filling up my house during steaming! :)

Strawberry Steamed Cake
Adapted from: Cuisine Paradise
Ingredients: (makes 4)
90g Plain Flour
1 tsp Baking Powder
2 tbsp Fine Sugar
1 Large Egg, 60g
50ml Strawberry Puree
2 Strawberries (diced for topping)
Preparation for the strawberry puree:
1. Dice 4-5 strawberries, add around 50ml of water and add sugar depending on the sweetness of the strawberries. (I added 1 tbsp)
2. Boil the mixture over low heat till strawberries soften,.
3. Remove from heat, mash the strawberries with a fork and stir till mixture becomes thick.
Directions:
1. Sift flour and baking powder in a bowl. Set aside. At the same time, preheat a steamer/wok filled with water till boiling point.
2. Using a balloon whisk, beat egg and sugar together till foamy and pale in colour.
3. Divide the sifted flour into two batches, stir in alternately with the strawberry puree to form a smooth batter. Add additional water if neccessary.
4. Spoon the cake batter evenly into 4 prepared foil/ramekins cups that are lined with paper liners. Add the diced strawberry cubes as topping.
6. Place the cups in the steamer/wok(with boiling water in it), cover and steam over high heat for about 12-15 minutes(depending on the size) or until a skewer inserted into one of the buns comes out clean.
 |
| love the colour so much, that I've made this the background pic of this blog :) |
Strawberry Steamed Cake
Adapted from: Cuisine Paradise
Ingredients: (makes 4)
90g Plain Flour
1 tsp Baking Powder
2 tbsp Fine Sugar
1 Large Egg, 60g
50ml Strawberry Puree
2 Strawberries (diced for topping)
Preparation for the strawberry puree:
1. Dice 4-5 strawberries, add around 50ml of water and add sugar depending on the sweetness of the strawberries. (I added 1 tbsp)
2. Boil the mixture over low heat till strawberries soften,.
3. Remove from heat, mash the strawberries with a fork and stir till mixture becomes thick.
Directions:
1. Sift flour and baking powder in a bowl. Set aside. At the same time, preheat a steamer/wok filled with water till boiling point.
2. Using a balloon whisk, beat egg and sugar together till foamy and pale in colour.
3. Divide the sifted flour into two batches, stir in alternately with the strawberry puree to form a smooth batter. Add additional water if neccessary.
4. Spoon the cake batter evenly into 4 prepared foil/ramekins cups that are lined with paper liners. Add the diced strawberry cubes as topping.
6. Place the cups in the steamer/wok(with boiling water in it), cover and steam over high heat for about 12-15 minutes(depending on the size) or until a skewer inserted into one of the buns comes out clean.
Sunday, November 4, 2012
Panna Cotta with Strawberry Sauce
Strawberries! Aren't they lovely? It was just too hard to resist when there are fresh and fragrant strawberries on sale.Without thinking twice, I just grabbed a box and decided that this shall be my project this weekend :) And hence... prepared this dessert specially for my dear friend who visited on Sunday, one of my favourite Italian desserts!

Panna Cotta with Strawberry Sauce
Ingredients: (makes 5 small cups)
2 tsp gelatine powder
3 tbsp water
450ml fresh milk
2 tbsp sugar
1/2 tsp vanilla essence
Directions:
1. Add gelatine powder to water, stir to dissolve the powder.
2. Combine the remaining ingredients in a saucepan and heat over low heat, stir till sugar dissolves and tiny bubbles appear around the edge of the pot.
3. Remove from heat and add in the gelatine mixture, stir until thoroughly incorporated.
4. Pour mixture into small cups, leave to cool till room temperature and refridgerate for at least 3 hours.
5. Serve with strawberry sauce and fresh strawberries.
For the strawberry sauce:
1. Dice 7-8 strawberries, add around 60ml of water and add sugar depending on the sweetness of the strawberries. (I added 1.5tbsp)
2. Boil the mixture over low heat till strawberries soften,.
3. Remove from heat, mash the strawberries with a fork and stir till mixture becomes thick. Set aside and serve when the panna cotta is ready.
Friday, November 2, 2012
Purple Sweet Potato Steamed Cake

Purple Sweet Potato Steamed Cake
Adapted from: Cuisine Paradise
Ingredients: (makes 4)
100g Plain Flour
1 tsp Baking Powder
25g Caster Sugar
1 Large Egg, 60g
50ml Water
1 purple sweet potato (about 120g)
Preparation for the sweet potato:
Peel the sweet potato and steam for 15 min till soft, cut it into two. Mash one part with a fork and mix with 50ml of water, dice the other half of it into small cubes.
Directions:
1. Sift flour and baking powder in a bowl. Set aside. At the same time, preheat a steamer/wok filled with water till boiling point.
2. Using a balloon whisk, beat egg and sugar together till foamy and pale in colour.
3. Divide the sifted flour into two batches, stir in alternately with the mashed sweet potato mixture to form a smooth batter. Add additional water if neccessary.
4. Spoon the cake batter evenly into 4 prepared foil/ramekins cups that are lined with paper liners. Add the diced sweet potato cubes as topping.
6. Place the cups in the steamer/wok(with boiling water in it), cover and steam over high heat for about 12-15 minutes(depending on the size) or until a skewer inserted into one of the buns comes out clean.
Tuesday, October 30, 2012
Mini Fruit Tarts
Prepared this specially for mum, a big fan of fruit tarts! Though the steps are simple, it took me around 3 hours to come out with this colourful tray of tarts. But the effort was all worthwhile, to see my family enjoying the tarts and giving me thumbs up :) Good motivation to continue learning to bake!


Mini Fruit Tarts
(A) Tart shell
Adapted from: iloveicookibake
Ingredients: (makes 20)
125g butter (room temperature)
50g caster sugar
½ egg
250g plain flour
Directions:
1. Cream the butter with caster sugar until white and creamy
2. Add egg and continue to beat
3. Fold in flour until it becomes a dough
4. Line the small tart tins with dough. Poke holes using a fork on the tart shell
5. Preheat oven at 175°C for 10 mins and bake for 10-15min till golden brown.
6. Slide tart out from mould and let it cool down
(B) Creme Pâtissière
Adapted from: Not The Kitchen Sink
Ingredients:
240 ml milk
1 tsp vanilla extract
2 egg yolks
30 g castor sugar
25 g cornflour
Directions:
1. Place the milk and vanilla extract in a saucepan over medium high heat and bring to a boil before setting aside.
2. Whisk together egg yolks and caster sugar in a bowl until the sugar dissolves and it becomes a pale yellow color. Add in the cornstarch and whisk until combined.
3. Slowly pour in the milk, making sure to whisk continuously. Pour the mixture back into the saucepan and heat over medium high heat. Continue whisking constantly until the mixture thickens. Once thickened, remove from heat and set aside to cool.
4. Once cooled, spoon into cooled tart shells and serve with fresh fruits.
 |
| colourful.... |


 |
| another variation instead of fruit toppings, i added blueberry jam :P |
Mini Fruit Tarts
(A) Tart shell
Adapted from: iloveicookibake
Ingredients: (makes 20)
125g butter (room temperature)
50g caster sugar
½ egg
250g plain flour
Directions:
1. Cream the butter with caster sugar until white and creamy
2. Add egg and continue to beat
3. Fold in flour until it becomes a dough
4. Line the small tart tins with dough. Poke holes using a fork on the tart shell
5. Preheat oven at 175°C for 10 mins and bake for 10-15min till golden brown.
6. Slide tart out from mould and let it cool down
(B) Creme Pâtissière
Adapted from: Not The Kitchen Sink
Ingredients:
240 ml milk
1 tsp vanilla extract
2 egg yolks
30 g castor sugar
25 g cornflour
Directions:
1. Place the milk and vanilla extract in a saucepan over medium high heat and bring to a boil before setting aside.
2. Whisk together egg yolks and caster sugar in a bowl until the sugar dissolves and it becomes a pale yellow color. Add in the cornstarch and whisk until combined.
3. Slowly pour in the milk, making sure to whisk continuously. Pour the mixture back into the saucepan and heat over medium high heat. Continue whisking constantly until the mixture thickens. Once thickened, remove from heat and set aside to cool.
4. Once cooled, spoon into cooled tart shells and serve with fresh fruits.
Monday, October 29, 2012
Broccoli Cheese Soup
Today, I tried making the food that I've been "cooking" in virtual world, in "Chefville", a popular cooking game created by Zynga on fb. :P Upon achieving mastery stars for the dishes, the game actually send the players real recipes of the dishes via emails! haha...so here are 3 of the dishes which I've "mastered" so far...

Broccoli Cheese Soup
Adapted from: Chefville
Ingredients: (makes 4 bowls)
1/2 tbsp butter
1 tbsp flour
half a yellow onion, diced
500g broccoli, chopped into small pieces
100g cheddar cheese, shredded
pinch of salt
pinch of black pepper
500ml fresh milk
Directions:
1. Saute onions in butter, stirring occasionally in medium sized pot until onions are tender. Whisk in flour completely.
2. Add broccoli and milk, cook on medium heat till broccoli is tender. Stir occasionally.
3. The flour should thicken up the soup. Add cheddar cheese and stir until melted.
4. Season with salt and black pepper.
Cheesey Stuffed Tomatoes

Cheesey Stuffed Tomatoes
Modified from: Chefville
Ingredients: (serves 2)
2 large tomatoes
1/4 yellow onion, diced
some yellow and red capsicum, diced (to add colour)
2 garlic, minced
200g minced beef
1 tbsp soy sauce
dash of pepper
drop of oil
some parmesan cheese
Directions:
1. Marinate minced beef with soy sauce and pepper, set aside for 15min.
2. Cut a thick slice of the top of each tomato. Leaving a 0.5 inch shell, scoop out the pulp. Invert tomatoes onto paper towels to drain.
3. Grill or bake tomatoes for about 10min.
4. Add a drop of oil to non stick frying pan, add minced garlic and fry till fragrant.
5. Add onions and capsicums, stir fry till onions are brown and capsicums soften. Then add in the minced beef. Remove from heat.
6. Scoop the mixed veges and beef into the tomato cups, sprinkle parmesan cheese and serve.
Tangy Orange Chicken

Tangy Orange Chicken
Adapted from: Chefville
Ingredients: (serves 3)
(A) Sauce and marinate
juice and zests from 1 medium sized orange
100ml rice vinegar
200ml mirin
2 tbsp soy sauce
3 tbsp sugar
1 tsp minced ginger
1/2 tsp minced garlic
3 tbsp cornstarch
2 tbsp water
(B) Chicken
1 chicken breast meat, cut into bite size
1 cup plain flour
1/2 tsp salt
dash of pepper
green onions or toasted sesame as garnish
Directions:
1. Pour mirin, orange juice, rice vinegar, soy sauce in saucepan, set over medium low heat. Stir on orange zest, sugar, garlic and ginger. Bring to simmer for 2min, remove from heat and cool for 15min.
2. Place chicken in a sealable plastic container. When contents of saucepan have cooled, pour a cup of sauce into container, reserve remaining sauce. Seal the container and refridgerate for at least 2hrs. The longer you marinate the chicken, the more flavour it will absorb.
3. Mix the flour, salt and pepper in a bowl. Toss the marinated chicken in the seasoned flour to coat. Heat some oil in a non stick pan over medium heat. Add chicken and brown on both sides. Remove and place on plate with paper towel, set aside.
4. Add remaining sauce to pan and boil over medium heat. Mix cornstarch and water together thouroughly and stir into the sauce. Reduce to low heat, add chicken pieces and simmer for about 5min, stirring occasionally. Garnish with green onions or toasted sesame.
Saturday, October 27, 2012
Chwee Kueh
Tried making one of the most popular local breakfast item, turned out to be much easier than imagined. I prepared the chai por the night before, and made the kueh fresh in the morning. In 30mins time, enjoyed the nice warm chwee kueh weekend breakfast with hubby :)

Chwee Kueh
Adapted from: http://jasnette.blogspot.sg/2005/07/chwee-kueh.html
(A) Kueh
Ingredients: (makes 10 using tart moulds)
180g rice flour
25g corn flour
800ml water
2 tbsp oil
½ tsp salt
Directions:
1. Place the two flours into a bowl and pour about 300 ml water. Mix to form a smooth batter.
2. Bring remaining (500ml) water, oil and salt to boil. Reduce to low heat. Pour in batter and stir constantly till it thickens.
3. Grease a few chwee kueh moulds. (i used tart moulds) Pour the mixture into each mould and place it on steamer. Steam over boiling water for about 10 minutes.
4. Remove from mould and spread topping over it.
5. Serve hot with radish topping.
(B) Chai Por
Adapted from: Baking & Cooking
Ingredients:
4 tbsp oil
50g garlic(chopped)
300g chai por
30g dried shrimps (minced)
3 tbsp sugar
1 tsp salt
1 tsp dark soya sauce
1 tbsp toasted white sesame
Directions:
1. Heat oil in a heavy sauce pan. Fry chai por, dried shrimp and minced garlic until fragrant. Add sugar, salt and dark soya sauce for seasoning.
2. Add toasted white sesame.
3. Serve with chwee kueh.
Thursday, October 25, 2012
Braised Pork Rice
Made this specially for hubbs... since he loves pork belly meat! Quite a successful first attempt on the whole, but was not satisfied with the texture of the meat, it wasn't soft enough. With some tips from mum, perhaps I should skip the "blanching in water" part and directly braise the raw meat in the sauce. But glad that hubbs enjoyed it... motivation for me to try again next time! :)
 |
| mum says everything looks soooo dark! |
Adapted from: happyhomebaking
Ingredients: (serves 2)
10 shallots
2 eggs
5 dried shitake mushrooms (sliced)
10g dried shrimps
250g pork belly
1 thumb size old ginger (about 5g) (minced)
3 cloves garlic (minced)
1tbsp oil
1tsp five spice powder
1tbsp Hua Tiao wine
3tbsp fried shallots*
1tbsp light soya sauce
1tbsp dark soya sauce
3tbsp fine sugar
1/4tsp salt
some water
Directions:
*to make fried shallots, peel about 10 shallots, cut into thin slices. Pan fry with oil until golden (turn off the heat once the shallots turn golden, it gets burnt easily). Drain on paper towel and leave to cool. Reserve the oil. Alternatively, you can use ready made fried shallots.
1. Place eggs (use room temperature eggs, cold eggs may crack easily upon boiling) in a pot and fill with enough water to cover the eggs, add a pinch of salt (to prevent eggs from cracking). Boil for about 10mins. Remove from pot and place eggs in cold water(easier to peel the shells). Peel and remove the shells. Set aside.
2. Wash dried mushrooms, soak in warm water for 30mins. Drain and cut into slices. Reserve the water.
3. Wash dries shrimps, soak in water for 30mins or until soften. Drain and minced.
4. Wash and cut pork belly into 1 cm cubes. Blanch in boiling water for about 3 mins. Rinse the blanched pork belly, drain and set aside.
5. Heat oil (reserved from frying shallots) in a wok. Stir fry minced ginger, garlic and dried shrimps till fragrant. Add in five spice powder, stir fry till fragrant. Add in blanched pork belly, stir fry till browned. Add mushrooms, toss to combine. Add wine by pouring it over the side of the wok, toss to combine. Add in fried shallots, light soya sauce, dark soya sauce, sugar, toss and stir fry to combine. Add the reserved water from soaking the mushrooms. Top with more water until it covers all the ingredients. Bring to a boil.
6. Transfer everything to a claypot or casserole (note: the water level should be over the ingredients by at least 2 inches). Add in the hard boiled eggs. Cover with lid and leave to simmer for about 1.5hrs (turn the eggs around in between the cooking time). Add in salt and continue to simmer for another 10mins. Taste and add additional seasoning to suit your taste.
7. Remove from heat. There should still be some sauce remaining when the dish is done, the sauce will appear glossy and thickened (from the fat of the pork belly).
8. Serve with rice and blanched xiao bai cai.
Tuesday, October 23, 2012
Hei Mama Egg Tarts (黑妈妈祖传蛋挞)
Quoted from Small Small Baker:
"Hei Mama Egg Tarts is a very hot recipe among the Chinese bloggers and receive very good ratings. The recipe originates from a Chinese blog by Hei Mama (黑妈妈) posted in year 2009. So that's how its name comes from. Along the years, it has also been modified and adapted by many bloggers and readers. Some of them never give credit to the original recipe!"
Indeed, this recipe is really good, especially for a first time baker like me. The steps are easy to follow, and I successfully came out with a batch of yummy egg tarts in two hours time...started "work" after lunch, and these fresh from the oven egg tarts came just in time for our tea break :)
Hei Mama Egg Tarts (黑妈妈祖传蛋挞)
Adapted from: Small Small Baker
Filling: (makes about 20 tarts)
100g sugar
300ml water
5 eggs, lightly beaten
150ml evaporated milk
1/2tsp vanilla essence
1. Heat up water and sugar until sugar dissolves. Leave it to cool.
2. Then add in beaten eggs and evaporated milk. Mix well, sieve the egg mixture and set aside.
Pastry:
300g plain flour
2 tbsp custard powder
1 egg
200g butter
1/2tsp vanilla essence
Directions:
1. Cut cold butter into small cubes. Combine flour, custard powder and mix well.
2. Rub in the cold butter, mix well and add beaten egg, mix to form a soft dough (do not knead).
3. Wrap with cling wrap and refrigerate at least 30min before use.
(Alternatively, you can try out this Melted Butter Easy Method by CookBakeLove)
1. Melt butter. Combine all dry ingredients and mix well,.
2. Add melted butter and beaten egg. Using a pair of chopsticks mix to form a soft dough. Wrap with cling wrap and refrigerate before use.
To assemble:
1. Divide the pastry dough equally into 20 pieces about 30g each (depending on your mould size). Press the dough into tart moulds evenly.
2. Bake tart casing in preheated oven at 180 deg C for 5min. Fill egg mixture into the casing till 90% full and bake for another 15-20mins till edges are brown.
"Hei Mama Egg Tarts is a very hot recipe among the Chinese bloggers and receive very good ratings. The recipe originates from a Chinese blog by Hei Mama (黑妈妈) posted in year 2009. So that's how its name comes from. Along the years, it has also been modified and adapted by many bloggers and readers. Some of them never give credit to the original recipe!"
Indeed, this recipe is really good, especially for a first time baker like me. The steps are easy to follow, and I successfully came out with a batch of yummy egg tarts in two hours time...started "work" after lunch, and these fresh from the oven egg tarts came just in time for our tea break :)
 |
| think I overbaked a little, looks more like Portuguese egg tarts huh? :P |
Hei Mama Egg Tarts (黑妈妈祖传蛋挞)
Adapted from: Small Small Baker
Filling: (makes about 20 tarts)
100g sugar
300ml water
5 eggs, lightly beaten
150ml evaporated milk
1/2tsp vanilla essence
1. Heat up water and sugar until sugar dissolves. Leave it to cool.
2. Then add in beaten eggs and evaporated milk. Mix well, sieve the egg mixture and set aside.
Pastry:
300g plain flour
2 tbsp custard powder
1 egg
200g butter
1/2tsp vanilla essence
Directions:
1. Cut cold butter into small cubes. Combine flour, custard powder and mix well.
2. Rub in the cold butter, mix well and add beaten egg, mix to form a soft dough (do not knead).
3. Wrap with cling wrap and refrigerate at least 30min before use.
(Alternatively, you can try out this Melted Butter Easy Method by CookBakeLove)
1. Melt butter. Combine all dry ingredients and mix well,.
2. Add melted butter and beaten egg. Using a pair of chopsticks mix to form a soft dough. Wrap with cling wrap and refrigerate before use.
To assemble:
1. Divide the pastry dough equally into 20 pieces about 30g each (depending on your mould size). Press the dough into tart moulds evenly.
2. Bake tart casing in preheated oven at 180 deg C for 5min. Fill egg mixture into the casing till 90% full and bake for another 15-20mins till edges are brown.
Monday, October 22, 2012
Ondeh Ondeh
Was inspired to try making this after browsing some nice pics posted by a fellow neighbour on FB. The recipe looks easy, and since me and hubbs really love sweets with gula melaka, decided to prepare this as dessert for today :)

This version is made without using any sweet potato, just glutinous flour and pandan paste to acheive the green colour. Brought to office for my colleagues to try, some commented that the texture was rather chewy, one said it was a bit hard, but glad that they enjoyed it afterall. Hubbs totally loved it, ate five pieces at one go! :)
Ondeh Ondeh (without sweet potato)
Adapted from: iloveicookibake
Ingredients: (makes around 25 balls)
250g glutinuous rice flour
50g rice flour
150ml water
1 tsp pandan paste
100g palm sugar - chopped
1/4 tsp salt
1 litre water
grated coconut
Directions:
1. Mix both flour, set aside
2. Mix water and pandan paste.
3. Pour the water mixture onto the flour mixture, mix and knead til forming a clay like texture
3. Take 1 tbsp dough, flatten, put palm sugar filling at the centre, close and shape like a ball.
4. Bring water to a boil, put the balls in it, let cook and float
5. Drain and immediately roll them on the grated coconut which has been mixed with salt til evenly covered
Note: Do steam the grated coconut for approx 15mins prior to use - it'll stay fresh longer.
~~~~~~~
Skin: (makes 20-22 balls)
180g purple sweet potato, mashed
50g glutinous rice flour
20g corn flour
25g sugar
30-45ml water, depending on the dough
Filling:
100g gula melaka, chopped
Coating:
1/2 young shredded coconut + pinch of salt, steamed for 5 minutes
Directions:
1. Mix skin ingredients and knead into a smooth dough.
2. Divide into small balls and wrap in filling.
3. Put balls into boiling water. Boil until balls float up, remove and coat with shredded coconut.
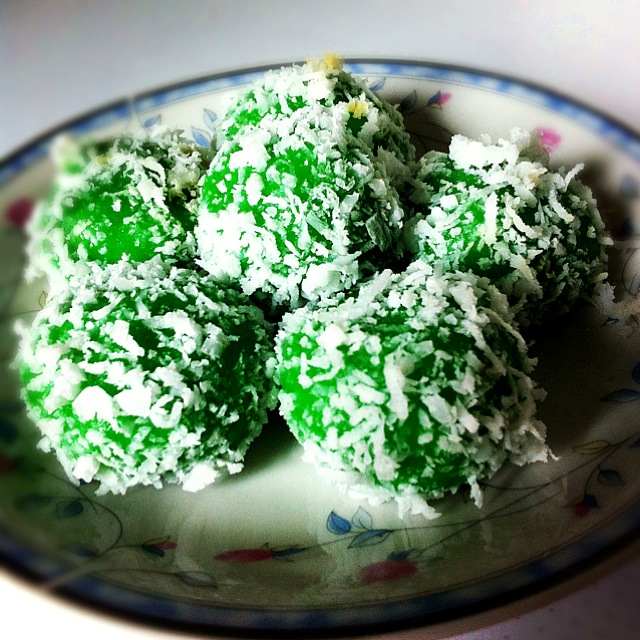
This version is made without using any sweet potato, just glutinous flour and pandan paste to acheive the green colour. Brought to office for my colleagues to try, some commented that the texture was rather chewy, one said it was a bit hard, but glad that they enjoyed it afterall. Hubbs totally loved it, ate five pieces at one go! :)
Ondeh Ondeh (without sweet potato)
Adapted from: iloveicookibake
Ingredients: (makes around 25 balls)
250g glutinuous rice flour
50g rice flour
150ml water
1 tsp pandan paste
100g palm sugar - chopped
1/4 tsp salt
1 litre water
grated coconut
Directions:
1. Mix both flour, set aside
2. Mix water and pandan paste.
3. Pour the water mixture onto the flour mixture, mix and knead til forming a clay like texture
3. Take 1 tbsp dough, flatten, put palm sugar filling at the centre, close and shape like a ball.
4. Bring water to a boil, put the balls in it, let cook and float
5. Drain and immediately roll them on the grated coconut which has been mixed with salt til evenly covered
Note: Do steam the grated coconut for approx 15mins prior to use - it'll stay fresh longer.
~~~~~~~
After "mastering" this delighful snack, it became my "contribution" for the weekend family potluck gathering. This time, I also tried the original recipe using sweet potato. I used purple ones to contrast it with the green ones using the above recipe. Hubbs helped with the preparation as well, fun afternoon in the kitchen together :)

Ondeh Ondeh (sweet potato version)
Skin: (makes 20-22 balls)
180g purple sweet potato, mashed
50g glutinous rice flour
20g corn flour
25g sugar
30-45ml water, depending on the dough
Filling:
100g gula melaka, chopped
Coating:
1/2 young shredded coconut + pinch of salt, steamed for 5 minutes
Directions:
1. Mix skin ingredients and knead into a smooth dough.
2. Divide into small balls and wrap in filling.
3. Put balls into boiling water. Boil until balls float up, remove and coat with shredded coconut.
Thursday, October 18, 2012
Fried Rice Vermicelli with Stew Pork Chops
I'm a great fan of rice vermicelli, (or beehoon) be it fried or cooked with soup. This dish (copied from my parents :P ) is one of our family's all-time favorite dish. It's simple, yet filled with so much fragrance, the canned stew pork chops really works wonders!

Fried Rice Vermicelli with Stew Pork Chops
Ingredients: (serves 4)
1/2 pkt rice vermicelli (soaked in water for at least 30min)
1 small can stew pork chops
2 eggs (lightly beaten)
1 small carrot (shredded)
1 small cabbage (shredded)
3 cloves garlic (minced)
10 frozen cooked shrimps (thawed)
few drops of oil
1tbsp light soy sauce
1tbsp dark soy sauce
dash of pepper
Directions:
1. Open the can of pork chops, remove the layer of oil on top. Remove the bones in the meat, then mash the meat with a fork. Keep the liquid in the can.
2. Fry a thin omelette with the egg. Shred the omelette into thin strips when cooled and set aside.
3. Add a few drops of oil to frying pan, stir fry garlic till fragrant and golden brown.
4. Add the cabbage and carrot, stir fry for 3min till colour changes.
5. Add the meat and shrimps, stir fry for a min.
6. Add the rice vermicelli, followed by the seasonings (add more if necessary). Add the liquid left behind in the pork chop can, cover the pan and simmer for 2min. Remove from heat and serve with omelette toppings.
Friday, October 12, 2012
Cheeseburger with Baked Beans
Something different for hubby's breakfast today :)

Cheeseburger with Baked Beans
Ingredients: (serves 2)
2 hamburger buns (sunshine)
2 beef patties (farmland)
2 slices cheese
2 pieces lettuce
2 pieces red lettuce
2 slices tomatoes
half can baked beans
2 drops cooking oil
Directions:
1. Add 2 drops of cooking oil to non-stick frying pan, fry the beef patty till both sides are golden brown. Turn off the flame but do not remove from pan.
2. Place cheese slices on the patty, allowing the cheese to melt a little on the patty.
3. Slice the hamburger bun into half, place the lettuce on the bottom half.
4. Place the patty with cheese, followed by a slice of tomato. Cover the burger.
5. Heat up the baked beans, place on red lettuce and serve together with burger.
Wednesday, October 10, 2012
Custard topped with Cocktail Fruits and Yoghurt
A simple and refreshing dessert after a heavy meal :)

Custard topped with Cocktail Fruits and Yoghurt
Ingredients: (serves 4)
40g custard powder
30g icing sugar (or fine sugar)
1 cup milk
1/4 cup water
1 cup yoghurt
1 cup cocktail fruits
Directions:
1. Add the custard powder and icing sugar to a small pot.
2. Stir in the water and milk gradually, to prevent clumps from forming.
3. Heat the mixture over low flame till the mixture thickens.
4. Place a layer of cocktail fruits in small glasses.
5. Add 1-2 tbsp of custard, then lay another layer of fruits.
6. Add 1-2 tbsp of yoghurt, and decorate the top with fruits.
7. Chill for 1 hour in the fridge, and the yummy dessert is ready to serve.
Wholemeal Wrap with Grilled Chicken and Enoki Mushrooms
Prepared this for dinner as I wanted something light and simple, DIY wrapping and eating. I guess this is also quite a complete meal, with carbo, protein, and fibre all in one :)

Wholemeal Wrap with Grilled Chicken and Enoki Mushrooms
Ingredients: (serves 4)
4 chicken drumsticks deboned
100g enoki mushrooms
8 pieces of lettuce (tear into small pieces)
2 medium sized tomato (sliced)
4 pieces of wholemeal wraps
few drops of cooking oil
Marinade for chicken:
1tbsp oyster sauce
1/2tsp sesame oil
a dash of black pepper
a dash of mixed herbs
Directions:
1. Marinade the chicken and leave aside for 30min.
2. Heat up the wraps (piece by piece) in a frying pan till both sides turn brownish, cut into halves and set aside.
3. Add a few drops of cooking oil. Grill the chicken on low flame, flip over after 3min, or till bottom side is golden brown and grill for another 3 min. Remove from pan once the chicken are cooked.
4. Add enoki mushrooms to the same pan, allowing the mushrooms to absorb the remaining sauce and excess oil from the chicken. Cook for around 2 min, till the mushrooms are soft. Remove from pan.
5. Place one halved piece of wrap on a flat plate, lay lettuce, a slice of tomato, a piece of chicken and some mushrooms. Fold up and enjoy!
Tuesday, October 9, 2012
Omelette with Chinese Sausage
Cooking at my mum's place, with the ingredients she prepared :)

Omelette with Chinese Sausage
Ingredients: (serves 4)
4 eggs
1 chinese sausage (sliced)
1/2 tbsp light soya sauce
a dash of pepper
2 drops cooking oil
Directions:
1. Beat the eggs, add light soya sauce and pepper.
2. Add 2 drops of cooking oil to non-stick frying pan, pour in the egg mixture.
3. Swerve the pan around to achieve a thin layer of omelette, add chinese sausages. Flip the omelette after 1 min. Serve.
Chicken Wings with Teriyaki Sauce

Chicken Wings with Teriyaki Sauce
Ingredients: (serves 4)
12 chicken wings (mid joint)
1 pkt Lee Kum Kee Sauce For Teriyaki Chicken
2/3 cup water
Directions:
1. Add sauce to a saucepan, add water. Stir the mixture.
2. Bring the mixture to a boil over medium flame, add the chicken wings and cook for another 10min till done. Serve.
Fried French Beans with Minced Pork

Fried French Beans with Minced Pork
Ingredients: (serves 4)
2 pkts french beans
3 cloves garlic (minced)
2 cloves shallot (sliced)
some dried shrimps (diced into small pieces)
some minced meat (seasoned with some soya sauce n pepper)
2 tbsp oyster sauce
few drops of cooking oil
Directions:
1. Add a few drops of cooking oil to non-stick frying pan, add garlic, shallot and fry till fragrant.
2. Add dried shrimps and minced meat, stir fry till meat is cooked.
3. Add in french beans, stir fry till beans soften and colour changes. Add some water and oyster sauce, stir for another 10 seconds and it's ready to serve.
Wednesday, October 3, 2012
Fried Marrow with Dried Shrimps
Prepared these two simple dishes, based on previous observations while mum cooked them.

Fried Marrow with Dried Shrimps
Ingredients: (serves 4)
1 medium sized marrow (shredded)
a small bunch of dongfen (soaked in water till soft)
some dred shrimps
3 cloves garlic (minced)
2tbsp oyster sauce
2tbsp water (or chicken stock)
2 drops cooking oil
Directions:
1. Add 2 drops cooking oil to non stick frying pan, fry garlic till brown and fragrant.
2. Over medium flame, add dried shrimps and dongfen, stir for 1 min and add shredded marrow.
3. Stir fry the marrow for 3 min, add oyster sauce and water.
4. Cover the pan, allowing the marrow to simmer for 2min till cooked. Serve.
Steamed Chicken with Shitake Mushrooms

Steamed Chicken with Shitake Mushrooms
Ingredients: (serves 2)
2 chicken thighs (chopped into small pieces)
5 dried shitake mushrooms (soaked in warm water and sliced)
some ginger (shredded)
a handfull of spring onion
1tbsp light soya sauce
1tbsp shao xing wine
1tsp sesame oil
a dash of pepper
Directions:
1. Marinade chicken pieces with light soya sauce, shao xing wine, sesame oil and pepper. Leave aside for 30min.
2. Place chicken on a plate, sprinkle mushrooms and ginger on top.
3. Prepare steamer, once water boils, place the chicken into steamer and steam for 10min over high flame.
4. Sprinkle spring onion on top, steam for another 3min and turn off the flame.
Monday, October 1, 2012
Steamed Banana Muffins
My first attempt for steamed cake...with one of my favourite fruit! Didn't have a mould to hold my muffin cups, so the cakes were all out of shape, but still satisfied with the taste :)

Steamed Banana Muffins
Ingredients: (6 big muffins)
2 eggs
100g sugar
2 ripe bananas, mashed (200g)
150g self-raising Flour
75g oil (any flavorless oil)
Directions:
1. Sift together self-raising flour and baking soda, set aside.
2. In a mixing bowl, whisk together Eggs and sugar till ribbon stage.
3. Mix in mashed bananas, beat till combine.
4. Gently fold in flour mixture and Oil, taking care not to deflate the eggs and sugar mixture.
5. Pour Batter into muffin pan, lined with muffin cups.
6. Steam over high heat for 15mins or till an inserted skewer comes out clean.
Monday, September 17, 2012
Fried Luffa with Prawns
Prepared 2 simple and delicious dishes "copied" from mum, which are also my favourites since young :) Mum's version uses fried egg tofu slices too, but I decided to save the trouble...haha.

Fried Luffa with Prawns
Ingredients: (serves 2)
1 medium sized luffa (cut into 1cm thick slices)
8 frozen cooked prawns (defrost)
20g dongfen (soaked in water for 30min)
1 egg (lghtly beaten)
3 cloves garlic (minced)
2 tbsp oyster sauce
a dash of pepper
some oil
Directions:
1. Add a few drops of oil to non-stick frying pan, add garlic and stir fry till brown and fragrant.
2. Add luffa and prawns, stir fry for about 5min till luffa changes colour and soften. Add oyster sauce and pepper (more if necessary to suit your taste).
3. Add the dongfen, mix well, then swirl in the egg. Remove from heat and serve.
Subscribe to:
Comments (Atom)